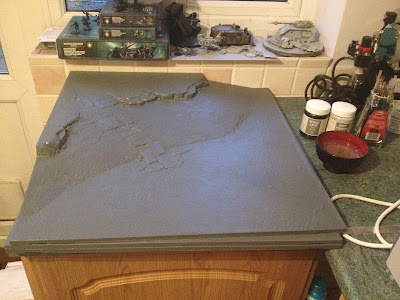
Today is the start of one of my primary 2012 goals: to get my gaming table done. I bought Games Workshop's ROB (Realm Of Battle) board not long after release and was over joyed at having a complete 6x4 table large enough to accommodate games of all the system I played, and more importantly has the capacity for easy storage. However like most good intentions, the board had been sitting untouched since the house move, so almost two years or so. With more games at my house on the horizon I decided that enough was enough, no longer would I play on an embarrassingly grey plastic board, it was time to put some time and effort into scenery and make use of those Vallejo pastes I have been stock piling.
The tools being used for this project are as follows:
Citadel Large Dry brush
Citadel Realm of Battle Gaming Board
Vallejo Stone Effect Black Lava
Vallejo Stone Effect Sandy paste
Vallejo Stone Effect Rough Grey Pumice
Citadel Warhammer 40,000 basing kit (slate etc)
I built a lot of tables during my time in Games Workshop, all of which were hand made with wood, foam board etc, including a Corsairs of Umbar ship (complete with ship) for Gamesday many years ago. My hope was to put some of that experience into designing my own table, however there in lies the problem. The ROB board is quite generic, the areas are flat with a few bits of cracked ground with skulls, in order to add creativity to the board I would probably be looking at a stylised generic board with space for plenty of scatter terrain (gaming friendly I suppose). As a result I decided to use the same them as my Minotaurs Space marines bases: dark ground, urban rubble, various grasses and of course snow. If all goes well, it might be generic enough to use for Fantasy set games too.
The plan is to get three ROB boards complete and one Forgeworld Board complete by the end of the month.
The first part of this project was to add a few details on the board sections, namely bits of rubble such as broken pillars and slate, enough to keep it interesting but too much to make games irritating. Next I broke out the large brush and started to cover each board section in Vallejo Stone Effect Black Lava. I love this stuff and use it for almost all my modelling projects, whether it is bases, scenery and in this case boards. The paste will add extra grip for figures on sloped areas and because it is black will form a decent and durable first layer.
On one of the flat sections of board (pictured above), I have used some Vallejo Stone Effect Sandy Paste to mark out an area I want as a 'pool', it will probably be a random flooded mass grave (to make use of the skulls) or a toxic dump, I have not really decided yet, either ways it allows me to make use of another one of my favourite mediums later on: Still water effects. Once I had marked out the rough area of the pool, a thicker lair of Black Lava was added to create the foundations for a raised bank.
Once the sections have dried a little, I started adding Vallejo Stone Effect Rough Grey Pumice sporadically around the board in patches, because some of the Black Lava was still wet, I was able to mix in the Rough Grey to a degree creating a less stark texture contrast. Because the grey pumice is so much more heavier and coarse, it is easier to create raised areas and give impressions of mild undulations (uneven ground), it also adds another strong layer of texture will will be picked out in the painting phase. This coarse areas are concentrated around rubble to emulate unsettled earth etc
More Grey Pumice is added to each section, to help mask any brush marks left during the Black Lava stage. Because the ROB board already has some texture from the cast, it is quite easy to 'blend' the two pumice types onto the board without leaving too much in the way of brush strokes. Once I finished the board section above, I stopped as nothing more can be done due to drying times. Tomorrow morning, I will add more Grey Pumice to the lip of the pool area and create a more pronounced bank around the pool and check for any thin areas, where the texture was spread out too much. Throughout the process of texture I liberally sprinkled loose bits of stone, slate, cork etc to help give a natural spread of rubble type, because of the pumice work times (45 mins) it is easy to go back to previous board section and add more detail if need be. All of these different texture and bits go along way to adding an interesting look to the table once the painting phase begins.
If all goes well and everything dries in time I will begin the base colouring stage tomorrow, and if I get set up comfortable I will try to video it on the camera.
Thanks for reading,
DiStudios
The 14th legion
All materials used are available from: Wayland Games - Discount Wargames


No comments:
Post a Comment